
Views: 0 Author: Site Editor Publish Time: 2025-10-27 Origin: Site


You might think building a pipe bend machine sounds tough, but you can do it if you follow the right steps. You get to learn with your hands and feel proud when you finish. > Take it slow, plan your work, and always focus on safety. Think about your goals and what tools you already have. This beginner’s guide helps you start with the basics, pick a machine type, gather materials, and build your own machine.
You can build a pipe bend machine, even if you are new. Follow each step in the guide. Be patient and learn as you work.
Pick the right pipe bender for your project. Manual, hydraulic, and electric benders all do different jobs.
Plan your build with care. Make clear goals and set a budget. Choose materials that fit what your machine needs.
Safety is very important. Always wear safety gear and follow rules. This helps stop accidents when building or using your machine.
Take care of your machine often. Look for worn parts and add oil to moving parts. Make sure everything lines up for good bends.
You might wonder if you can really build a pipe bend machine as a beginner. The answer is yes! Many people start with little experience and finish with a working machine. You do not need to be an expert. You just need to follow a beginner’s guide, stay patient, and learn as you go.
You already have some of the skills you need. Here are a few helpful abilities that make the process easier:
Mechanical aptitude: You understand how tools work and how parts fit together.
Measurement and marking: You can use a tape measure and mark pipes for bending.
Physical strength and dexterity: You can handle tools and move pipes, especially if they are heavy.
Welding or joining skills: You can join metal parts, which helps if you want to build furniture or other projects.
Design and layout skills: You can plan how your bent pipes will fit into your project.
If you do not have all these skills yet, do not worry. You can learn them as you build.
Building a pipe bend machine takes a few main steps. Each step brings you closer to your goal. Here is a simple path you can follow:
Learn the basics of pipe bending and machine types.
Choose the right design for your needs.
Gather materials and tools.
Prepare your workspace.
Cut and assemble the frame.
Install dies and rollers.
Test your machine and make adjustments.
You may face some challenges along the way. Here is a table that shows common problems and how professionals handle them:
| Challenge | Description | How to Handle It |
|---|---|---|
| Material springback | The pipe tries to return to its original shape after bending. | Bend the pipe a bit more than needed to get the right angle. |
| Cracking at the bend | The pipe cracks if it is too hard or bent too quickly. | Use heat to soften the pipe or choose a better bend radius. |
| Wrinkling | The pipe surface gets uneven if it is too thin or bent wrong. | Use the right tools and make sure the pipe is thick enough. |
| Inconsistent bend angles | Bends are not the same, which can cause problems in your project. | Measure carefully and use guides to keep bends even. |
| Difficulty in complex shapes | Making tricky shapes can lead to cracks or mistakes. | Plan your bends and take your time with each step. |
| Thickness variations | Pipes with different thicknesses can bend unevenly. | Check your pipes before you start and use good quality materials. |
| Selecting the right material | The wrong pipe can wear out your tools or make bending hard. | Learn about different metals and pick the best one for your project. |
Stay positive and remember, every expert started as a beginner!

Image Source: unsplash
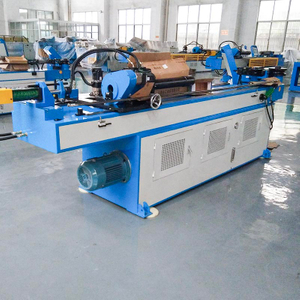
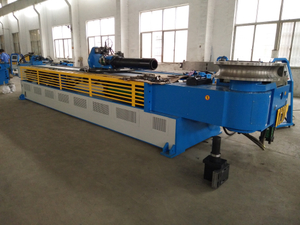
A pipe bend machine lets you bend metal pipes. You can make pipes curve or turn at an angle. You do not need to cut or weld the pipe. This tool helps you work faster and makes smooth bends. The bends look neat and even every time.
You can find these machines in many places. Factories use them to build things. Workshops and garages also have them. They help make furniture, railings, and car parts. When you use a pipe bend machine, your bends are strong and look good.
Here is why a pipe bend machine matters in mechanical work:
A tube bending machine is important in industry and construction for bending pipes into different shapes.
Bending is needed to make complex pipe structures.
The machine works for metal processing and fits most metals and alloys.
You do not have to be an expert to use one. With some practice, you can bend pipes for your own projects.
Tip: Always check what kind of metal you have before bending. Some metals are easier to bend than others.
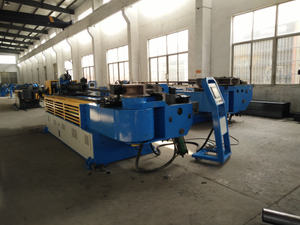
You can use a pipe bend machine for many jobs. It works for big projects and small home tasks. The machine you pick depends on your project and how much power you need.
Here is a quick look at different pipe benders and what they do:
| Type of Pipe Bender | Description | Primary Uses |
|---|---|---|
| Manual Pipe Benders | Good for small jobs and simple bends. You use your own strength. | DIY projects, small repairs |
| Hydraulic Pipe Benders | Use hydraulic power for more force and better bends. | Construction, automotive applications |
| Electric Pipe Benders | Give high precision and can bend many pipes fast. | Manufacturing, mass production |
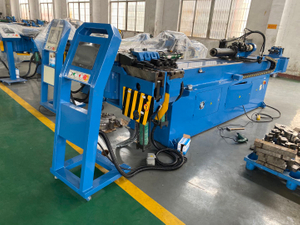
| CNC Pipe Benders | Advanced machines for bending complex shapes automatically. | Large production runs, complex designs |
You might use a manual bender for a garden job. You might use a hydraulic bender for fixing a car pipe. Factories use electric or CNC benders to make lots of parts. No matter what you build, a pipe bend machine helps you get the shape you want.
Choosing the right pipe bend machine can feel confusing at first. You have three main types to consider: manual, hydraulic, and electric. Each one has its own strengths. When you know the differences, you can pick the best design for your DIY project. This beginner’s guide will help you understand what makes each type unique.
| Type | Bending Capacity | Speed | Ease of Use | Application Suitability |
|---|---|---|---|---|
| Manual | Limited | Slower | Moderate | Simple, small-scale tasks |
| Hydraulic | High | Faster | Easy | Heavy-duty jobs, complex bends |
| Electric | Medium | Very Fast | Very Easy | Medium projects, jobs that need precision |
Manual pipe bend machines use your own strength to bend pipes. You turn a handle or pull a lever. These machines work best for small jobs and simple bends. You do not need much experience to use one. Many beginners start with a manual bender because it is affordable and easy to control. If you want to bend thin or soft pipes for a home project, this type is a great choice.
Tip: Manual benders are perfect for learning. You can see how the pipe moves and learn the basics of bending.
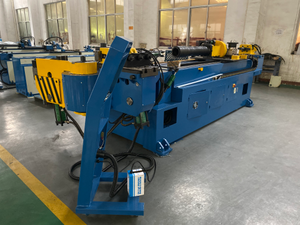
Hydraulic pipe bend machines use fluid power to help you bend pipes. You pump a handle, and the machine does most of the hard work. These machines can bend thicker pipes and make more complex shapes. They work faster than manual benders and need less effort from you. If you plan to work on bigger projects or need to bend tough materials, a hydraulic bender is a smart pick.
Electric pipe bend machines use a motor to bend pipes. You press a button, and the machine bends the pipe for you. These machines work very fast and give you precise results. They are great for medium-sized projects or when you need to make many bends that look the same. Electric benders cost more and can be harder to build at home, but they save you time.
When you understand these types, you can choose the right design for your DIY build. Most beginners start with a manual bender. It is simple, safe, and helps you learn the basics before moving on to more advanced machines.
Before you start building, you need to set clear goals. Think about what you want your pipe bend machine to do. Do you want to bend small pipes for home projects, or do you need something stronger for bigger jobs? Your goals will help you decide how simple or advanced your machine should be.
Budget is just as important. You do not have to spend a lot, but knowing your budget helps you make smart choices. Here is a quick look at how your budget can shape your project:
| Budget Level | Machine Type | Material Quality | Capabilities |
|---|---|---|---|
| Lower Budget | Manual Benders | Basic materials | Limited precision |
| Higher Budget | Hydraulic/CNC Benders | High-quality materials | Greater precision and efficiency |
If you want to keep costs low, a manual bender with basic materials works well for most beginner projects. If you have more to spend, you can build a machine with better parts and more features.
Choosing the right design is a big step in this beginner’s guide. You want a machine that fits your needs and skills. Here are some things you should think about before you start building:
Type and size of pipe you plan to bend
How accurate you want your bends to be
What tools you already have
How much space you have in your workspace
How easy the machine will be to use and maintain
Safety features and following safety rules
You do not need a fancy design to get started. Pick something simple if you are new to building machines. As you learn, you can always upgrade or add new features. Remember, planning now saves you time and trouble later. Take your time, ask questions, and enjoy the process!
Getting the right materials and tools makes your build much easier. You want your pipe bend machine to last and work well, so start with strong parts and the right equipment.
You need heavy wall tubes or pipes for the frame. These tubes give your machine strength and keep it from bending or breaking when you use it. Pick tubes with the correct diameter for your project. If you use thin or weak tubes, your machine might twist or fail during bending.
Here’s a quick look at some materials you can use for your frame:
| Material | Description |
|---|---|
| Carbon Steel | Strong and reliable, comes in different grades for many uses. |
| Mild Steel | Easier to bend, good for most beginner projects. |
| Spring Steel | Very strong, needs heat to bend, great for heavy-duty machines. |
| Aluminum | Lightweight and easy to work with, but not as strong as steel. |
| Copper | Soft and easy to bend, best for light jobs. |
| Iron | Strong but harder to shape, use if you need extra strength. |
| Alloys | Mixes of metals, can give special features like extra strength or flexibility. |
Tip: For most beginners, mild steel or carbon steel works best. These materials are easy to find and strong enough for most jobs.
Die sets shape your pipe as you bend it. You need the right die for the size and shape of your pipe. If you use the wrong die, your pipe might kink or flatten. You can buy die sets or make your own if you have the right tools. Good dies help you get smooth, even bends every time.
Make sure your die matches your pipe’s diameter.
Use strong materials for your dies, like steel or hard alloys.
Check that your dies fit snugly in your machine.
You do not need fancy tools to get started. Here are some basics you should have:
Tape measure and marker
Angle grinder or hacksaw
Drill and drill bits
Welder (for metal frames)
Wrenches and screwdrivers
Clamps
Safety gear (gloves, goggles, ear protection)
If you have these tools, you can build most simple pipe bend machines. As you gain experience, you might add more tools to your workshop.

Image Source: unsplash
Building your own pipe bend machine feels like a big project, but you can break it down into simple steps. Let’s walk through each part together so you know what to expect and how to get the best results.
Start by setting up a safe and organized workspace. You want plenty of room to move around and lay out your materials. Make sure your area has good lighting. Keep your tools within reach. Clear away anything you don’t need so you don’t trip or lose small parts.
Tip: Always keep a broom or shop vacuum nearby. Metal shavings and dust can make your workspace slippery or unsafe.
Check your workbench for stability. If you plan to weld, make sure you have a fire extinguisher close by. Wear your safety gear—gloves, goggles, and ear protection. Good prep now saves you time and keeps you safe later.
Now you’re ready to cut and assemble the main parts of your machine. Follow your design plans closely. Measure each piece twice before you cut. Mark your tubes with a marker so you know exactly where to cut or drill.
Here are some best practices for this step:
Follow the design guidelines for tube cutting and bending. This helps your machine work right.
Make sure every cut feature is at least 1.5 times the wall thickness of your tube. This keeps your frame strong.
Think about where the bends will go in your system. Good planning makes your machine safer and more efficient.
Use an angle grinder or hacksaw to cut your heavy wall tubes. Drill holes where you need to attach bolts or pins. Weld or bolt the frame together, checking that everything lines up. Take your time with each joint. If something looks crooked, fix it before you move on.
Note: If you’re new to welding, practice on scrap metal first. Strong welds keep your machine safe.
This step is where your machine starts to take shape. The dies and rollers do the real work of bending the pipe, so you want to install them carefully.
First, position the two lower rollers on your frame. These rollers support the pipe. Place the upper roller above them. This roller pushes down to bend the pipe. You can adjust the upper roller’s position to change the bend radius. Move it closer for tighter bends or farther away for bigger curves.
To get accurate bends, follow these steps:
Mark a line on your pipe 10 inches from the end. This is where your bend will start.
Figure out the bend offset for your die. For example, if you use a 4.5-inch radius die, your offset is about 5 1/4 inches.
Draw a second line 5 1/4 inches closer to the end from your first mark. This helps you line up the pipe in your machine.
Slide your pipe between the three rollers. The two lower rollers hold it steady. The upper roller presses down to make the bend. Adjust the upper roller as needed for the bend you want.
Tip: Always check that your dies and rollers fit snugly. Loose parts can cause uneven bends or damage your pipe.
You’re almost ready to start bending! Before you do, double-check your machine. Make sure all bolts are tight and nothing wobbles. Spin the rollers by hand to see if they move smoothly. Clean away any dirt or metal shavings from the bending area.
Here’s a table of common mistakes people make during final setup and how to avoid them:
| Mistake Description | Explanation |
|---|---|
| Using worn or deformed bending rolls | These can damage your pipe or mess up your bend. Dirt or foreign objects make the problem worse. |
| Bending too close to the pipe end | This makes it hard to install fittings later. Keep at least twice the length of the union nut before a bend. |
| Not accounting for springback | Pipes try to straighten out after bending. Bend your pipe 1–2° more than you need to get the right angle. |
Remember: Take your time with the final checks. A little patience now means fewer problems later.
Once you finish these steps, your pipe bend machine is ready for action. You built it yourself—now you can start bending pipes for your next project!
Staying safe matters every step of the way when you build and use a pipe bend machine. You want to protect yourself and keep your workspace accident-free. Let’s look at the basics you need to know.
You need the right gear before you start. This gear keeps you safe from sharp edges, flying debris, and loud noises. Here’s what you should wear:
Gloves protect your hands from cuts and scrapes.
Safety goggles shield your eyes from metal shavings and dust.
Ear protection helps block out loud sounds from cutting and grinding.
Tip: Always check your gear before you begin. Replace anything that looks worn or damaged.
Power tools make your job easier, but you must use them safely. You can follow these steps to avoid injuries:
Put on your safety goggles, gloves, and sturdy boots.
Read the instruction manual for each tool. Know how it works.
Ask for help or training if you’re new to a tool.
Watch out for sharp metal burrs. Don’t touch edges with bare hands.
Keep metal sheets dry. Wet metal can make you slip.
Line up your metal pieces straight before you start bending.
Warm up your machine if your shop feels cold.
Clean your workbench. Remove scrap metal and clutter.
Check your tools and machine for damage before you use them.
Use remote controls or automated tools if you have them.
Note: Never rush with power tools. Take your time and focus on each step.
You might face a few dangers while building and using your machine. Here’s a quick table to help you spot the most common hazards:
| Safety Hazard Type |
|---|
| Machine operations |
| Material handling |
| Chemical exposure |
| Workspace conditions |
Stay alert for these risks. You can avoid most problems by following safety rules and keeping your area clean.
Remember, safety comes first. If you’re ever unsure, ask for help or take a break to double-check your setup.
You finished building your pipe bend machine. Now it’s time to see if it works! Testing helps you spot problems before you start a real project. Here’s a simple way to test your machine step by step:
Check your welds. Look at every weld on your frame. Make sure there are no cracks or holes. Good welds keep your machine strong.
Clean up your parts. Use a grinder to smooth out sharp edges or rough spots. This keeps you safe and helps the machine run better.
Set up your machine. Make sure all the rollers and dies fit tight. Check that nothing wobbles or feels loose.
Test the movement. Turn the handle or press the lever. The rollers should spin smoothly. If something sticks, stop and fix it.
Try a practice bend. Use a scrap piece of pipe. Mark your bend lines and place the pipe in the machine. Bend it slowly and watch for any problems.
Look for defects. After bending, check the pipe for cracks, wrinkles, or flat spots. If you see any, you may need to adjust your setup.
Double-check alignment. Make sure the pipe stays straight as you bend it. If it moves out of place, check your guides and rollers.
Tip: Always inspect your machine and your test bends before you start a big project. Small fixes now save you trouble later!
Sometimes, things don’t go as planned. Here are some common issues you might see during your first test:
| Issue | Description |
|---|---|
| Springback | The pipe tries to straighten after bending, so your angle is off. |
| Calibration | The settings are wrong, so bends don’t match your marks. |
| Hydraulic Issues | The hydraulic system doesn’t push right, so the bend is weak or uneven. |
| Die Wear | The dies look worn out or broken, which makes the pipe bend the wrong way. |
If you run into problems, try these quick fixes:
Make sure you press down in the right spot. This helps avoid flattening or buckling.
If the pipe flattens too much, use a bigger bend radius or reduce the pressure.
Watch for wrinkles or buckles. Smooth bends mean your setup is right.
If the pipe springs back, bend it a little more than you need.
Check your mandrel or guides. They should hold the pipe steady during bending.
Remember: Testing and fixing your machine helps you get better results every time. Don’t worry if you need to make a few changes—every builder does!
Taking care of your pipe bend machine keeps it working smoothly and helps it last longer. You don’t need to be an expert to handle routine maintenance. Just follow a few simple steps, and you’ll avoid most problems before they start.
You should check your machine often. Make a habit of looking over the moving parts and adding a little oil where things move. This keeps everything running without squeaks or jams. If you have a hydraulic bender, check the oil level in the tank every week. Clean the hydraulic parts once a month to keep dirt and dust from causing trouble.
Here’s a quick table to help you remember when to do each task:
| Maintenance Task | Frequency |
|---|---|
| Check oil level of the tank | Weekly |
| Replace oil | After 2000 hours (new machine), then every 4000-6000 hours |
| Clean hydraulic components | Monthly |
| Check pipe bending deformation | After 1 month of use |
| Tighten connections | After 2 months of use |
You should also look at the electrical wires and controls every week. Make sure nothing looks worn or loose. Once a month, check the alignment and calibration. This helps your bends stay accurate.
Tip: Write down your maintenance tasks in a notebook. This way, you won’t forget what you’ve done or what needs attention next.
You can stop most wear and tear before it starts. Always turn off the machine’s power before you work on it. Lubricate all holes, bolts, and fasteners every day. If you spot a damaged part, replace it right away. Don’t wait for it to get worse.
Try these simple habits to keep your machine in top shape:
Drain and refill the hydraulic oil on schedule. Clean oil helps everything move smoothly.
Wipe down the machine after each use. Dirt and metal shavings can cause extra wear.
Lubricate the elbow table and rollers often. This reduces friction and keeps bends smooth.
A little care goes a long way. If you treat your machine well, it will help you with many projects for years to come!
Building your own pipe bend machine feels exciting, but you can run into trouble if you skip careful planning or rush through steps. Let’s look at some common mistakes and how you can steer clear of them.
You might want to jump right in, but planning matters. If you don’t set clear goals, you can waste time and money. Sometimes, people forget to measure their workspace or check if their tools fit the job. You should always ask yourself these questions:
What size pipes do you want to bend?
How much space do you have for your machine?
Do you have the right materials and tools?
If you skip these steps, you might end up with a machine that doesn’t work for your needs. Take a few minutes to write down your plan. It helps you stay on track and avoid surprises.
When you start putting your machine together, you might face some problems. Here are mistakes beginners often make:
Trusting theory and ignoring how materials spring back after bending.
Assuming your tooling setup is perfect or using worn-out parts.
Thinking brute force will solve every problem.
Forgetting about space and how parts fit together.
Ignoring the need for clamping allowance.
If you pay attention to these points, your machine will work better. Always check your parts before assembly. Don’t force pieces that don’t fit. Measure twice and test your setup before you start bending.
Safety should always come first. Some common lapses can lead to serious injuries or damage. Here’s a quick table showing what can go wrong:
| Safety Lapse | Consequence |
|---|---|
| Not properly training users | Can lead to critical injuries |
| Neglecting maintenance | May result in machinery breakdowns and accidents |
| Failing to keep hands away from moving parts | Can cause serious injuries during operation |
You should always keep your hands away from the bending die and moving parts. Stay alert and watch where you place your hands. Operators must pay close attention during every step. If you follow safety rules, you protect yourself and your project.
Remember, a little caution goes a long way. Take your time, double-check your setup, and enjoy building safely!
You’ve seen every step in this beginner’s guide, from planning to testing. Building your own pipe bend machine is possible, even if you’re new. Celebrate each win and learn from mistakes. Here are some tips from successful builders:
Pick a versatile machine that can handle more than you need.
Make sure your machine fits standard tools.
Keep maintenance easy and get training if you can.
“Support and adaptability matter more than just price or capacity. Your machine should grow with your needs.”
Share your results or ask for help. You’re part of a creative community!
You can do it! Start with a simple manual design. Follow each step in this guide. Take your time and ask for help if you get stuck. You will learn as you go.
You can bend steel, aluminum, or copper pipes. Make sure the pipe fits your machine’s size and strength. Thicker pipes need stronger machines. Always check your materials before you start.
Welding helps make a strong frame. If you do not weld, you can use bolts and brackets. Some designs work with basic tools. Practice welding on scrap metal if you want to learn.
Use a tape measure and angle finder. Mark your pipe before bending. After bending, check the angle and shape. If it looks off, adjust your setup and try again.
Tip: Practice on scrap pipes first. This helps you get the feel for your machine.